To potential buyers:
The motherboard is NOT Ryzen 5xxx ready. In other words, if you want to use it with 5600x/5800x, etc., you need to first perform a BIOS update.
Personally, since I had never flashed a motherboard without a CPU/RAM before, I was a bit anxious, but the process is very simple.
1) Connect a USB flash drive (preferably up to 32gb, not more) and format it to FAT32 (Default), leaving the allocation unit size as it is (16 kilobytes) (any files inside will be lost).
2) Go to the motherboard's website -> support -> downloads -> BIOS category -> download the F10 file.
3) Extract the folder that you downloaded with the 4 files directly onto the USB stick (either by copy-pasting after extracting) and look for the file A520AOEL.F10. Rename this specific file to GIGABYTE.bin (you can leave the other files readme/efiflash.exe inside the USB stick, they won't bother us). Safely remove the USB stick and it's ready.
4) Take the motherboard and connect ONLY the 24-pin and 8-pin CPU connectors, without any hardware on top. Place the USB stick in the TOP LEFT position, labeled BIOS and colored blue.
5) Turn on/connect the power supply and press the QFLASH button for 2 seconds, located to the right of the 24-pin connector. An LED will start blinking and after a while, the fan on the power supply will start running. After 3-4 minutes, the LED will turn off and the power supply fan will stop.
6) Remove the power supply, take out the USB stick, and the motherboard is updated and ready to accept Ryzen 5000 series.
The process, although a bit nerve-wracking for someone doing it for the first time, is quite simple and anyone can do it. You can find a detailed video here: [link to YouTube video]
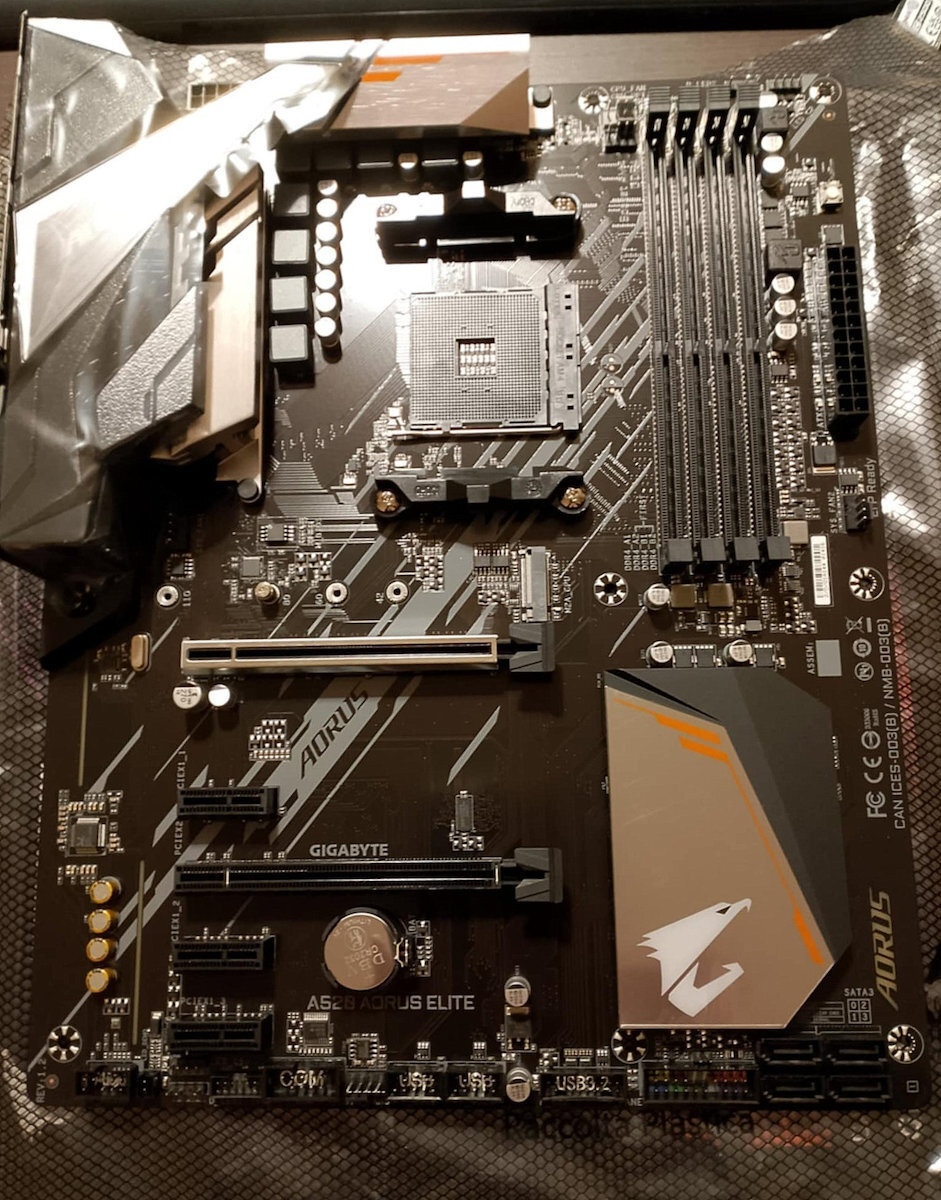
Now, as for the motherboard itself, it seems to be of good quality. It worked fine with the 5600x without any issues, and at a glance while using it for regular tasks, the temperatures and voltage on the motherboard are running at normal levels.
If you're not interested in overclocking the processor, don't plan on using more than 2 SSD/HDD, and want a motherboard with decent VRM, pre-installed I/O shield, a large number of USB ports, and a slightly more aesthetically pleasing design with all the necessary connectors (3 case fans, 2 addressable RGB, etc.), it is a solid choice (worth the price compared to cheaper B550 motherboards).
-The BIOS is a bit ugly, but in A520, you don't have many options, so it doesn't matter.
-XMP ran smoothly and without any issues with Corsair Vengeance RGB Pro.
-The RGB fusion doesn't offer many options, but it seems functional.
-The motherboard only has LED lighting at the bottom right where it says Aorus.
-During installation, remove the rear fan of the case beforehand because the heatsink above the I/O shield is large and will make it difficult. Personally, in the Dx500 case, which has 140mm fans, I couldn't install it without removing them.
-A negative aspect is that it comes in a plain box, without extra packaging or being sealed, so it would be good to check if it's a used/returned item.
If any issues arise or for any updates, I will inform you.
Προς υποψήφιους αγοραστές:
Η μητρική ΔΕΝ είναι Ryzen 5xxx ready. Με λίγα λόγια, αν θέλετε να την χρησιμοποιήσετε με 5600x/5800x κ.ο.κ, πρέπει πρώτα να γίνει Bios update.
Προσωπικά μιας και δεν είχα ξαναφλασάρει μητρική χωρίς cpu/ram με άγχωνε, αλλά η διαδικασία είναι πολύ απλή.
1) Συνδέουμε ένα USB flash drive (κατα προτίμηση μέχρι 32gb, όχι περισσότερο) και το κάνουμε format σε FAT32 (Default), το allocation unit size το αφήνουμε ως έχει (16 kilobytes) (ο,τι αρχείο έχουμε μέσα θα χαθεί)
2) Πηγαίνουμε στο site της μητρικής -> support -> downloads -> κατηγορία BIOS -> κατεβάζουμε το αρχείο F10
3) Κάνουμε extract τον φάκελο που κατεβάσαμε με τα 4 αρχεία απευθείας στο Usb στικακι (είτε με copy paste αφού τα έχουμε κανει extract) και ψάχνουμε το αρχείο A520AOEL.F10. Κάνουμε το συγκεκριμένο αρχείο rename σε GIGABYTE.bin (μπορούμε να αφήσουμε και τα υπόλοιπα αρχεία readme/efiflash.exe μέσα στο στικακι, δεν μας ενοχλει). Κάνουμε ασφαλή κατάργηση και το στικακι ειναι έτοιμο.
4) Παίρνουμε τη μητρική και συνδέουμε ΜΟΝΟ το 24pino και το 8pin του Cpu, χωρίς κανένα hardware πανω. Τοποθετούμε το usb stick στην ΠΑΝΩ ΑΡΙΣΤΕΡΑ θέση, που λέει BIOS και έχει μπλε χρώμα.
5) Ανοίγουμε/συνδέουμε το τροφοδοτικό στο ρεύμα και πατάμε για 2 δευτερόλεπτα το κουμπί QFLASH που βρίσκεται δεξία από το 24pin. Θα αρχίσει ένα led να αναβοσβήνει και μετά από λίγο θα ξεκινήσει και το ανεμιστηράκι από το τροφοδοτικό. Μετά απο 3-4 λεπτά το led θα σβήσει και ο ανεμιστήρας του τροφοδοτικού θα σταματήσει.
6) Αφαιρούμε τροφοδοτικό, βγάζουμε το usb stick και η μητρική είναι updated και έτοιμη για να δεχτεί ryzen 5000 series.
Η διαδικασία αν και λίγο αγχωτική για κάποιον που την κάνει πρώτη φορά, είναι αρκετά απλή και ο καθένας μπορεί να το κάνει. Αναλυτικό βίντεο θα βρείτε και εδώ https://www.youtube.com/watch?v=dWhmqCDdCzI&ab_channel=Mike%27sunboxing%2Creviewsandhowto
Τώρα όσον αφορά τη μητρική την ίδια, φαίνεται ποιοτική, μου δούλεψε με 5600x χωρίς κανένα πρόβλημα και με μια γρήγορη ματιά την ώρα που έκανα απλή χρήση οι θερμοκρασίες και η τάση στη μητρική τρέχουν σε φυσιολογικά επίπεδα.
Αν δεν σας ενδιαφέρει να κάνετε OC τον επεξεργαστή, δεν έχετε σκοπό να βάλετε πάνω από 2 ssd/hdd και θέλετε μια μητρική με decent vrm, pre-installed I/O shield, μεγάλο πλήθος θυρών USB και λίγο πιο όμορφη με όλα τα απαραίτητα connectors (3 case fans, 2 addressable rgb κ.ο.κ), είναι μια solid επιλογή (στα 80€ αξίζει συγκριτικά με τις πιο φθηνές b550).
-To bios λίγο ασχημούλικο, αλλά σε a520 δεν έχεις και πολλές επιλογές, οπότε αδιάφορο.
-Το Xmp έτρεχε άμεσα και απροβλημάτιστα και Corsair Vengeance RGB Pro.
-To RGB fusion δεν δίνει πολλές επιλογές, αλλά φαίνεται λειτουργικό
-Η μητρική έχει led φως μόνο κάτω δεξιά στο σημείο που λέει Aorus
-Κατά την εγκατάσταση βγάλτε από πριν το rear fan του κουτιού, γιατί το heatsink πάνω από το I/O shield είναι μεγάλο και θα σας δυσκολέψει. Προσωπικά εγώ σε Dx500 που έχει 14αριδες ανεμιστήρες, δεν μπόρεσα να την βάλω χωρίς να τους αφαιρέσω.
-Αρνητικό το ότι έρχεται με σκέτο κουτί, χωρίς έξτρα περίβλημα ή σφραγισμένη, οπότε καλό θα ήταν να ελεγχθεί μην τυχόν και είναι κομμάτι που έχει χρησιμοποιηθεί/επιστραφεί
Αν παρουσιαστεί κάποιο πρόβλημα, ή για ο,τι νεότερο ενημερώνω.