Discover the NodeMCU V3 with CH340G. Open-source platform with Lua & Arduino style programming, ideal for rapid development of IoT applications at the lowest market cost.
Discover the NodeMCU V3 with CH340G. Open-source platform with Lua & Arduino style programming, ideal for rapid development of IoT applications at the lowest market cost.
Users rate the board very positively, particularly for its built-in Wi‑Fi and how easy it is to use with Arduino and other projects. They use it for automation, measurements, and LED control, and note that it can help reduce project costs. However, some mention difficulties with the drivers and setup, and one user reported receiving a board without a Wi‑Fi chip.
⭐⭐⭐⭐⭐
NodeMCU ESP8266 – The "heart" of every smart project!
You can do SO many things with it (just like ARDUINO)
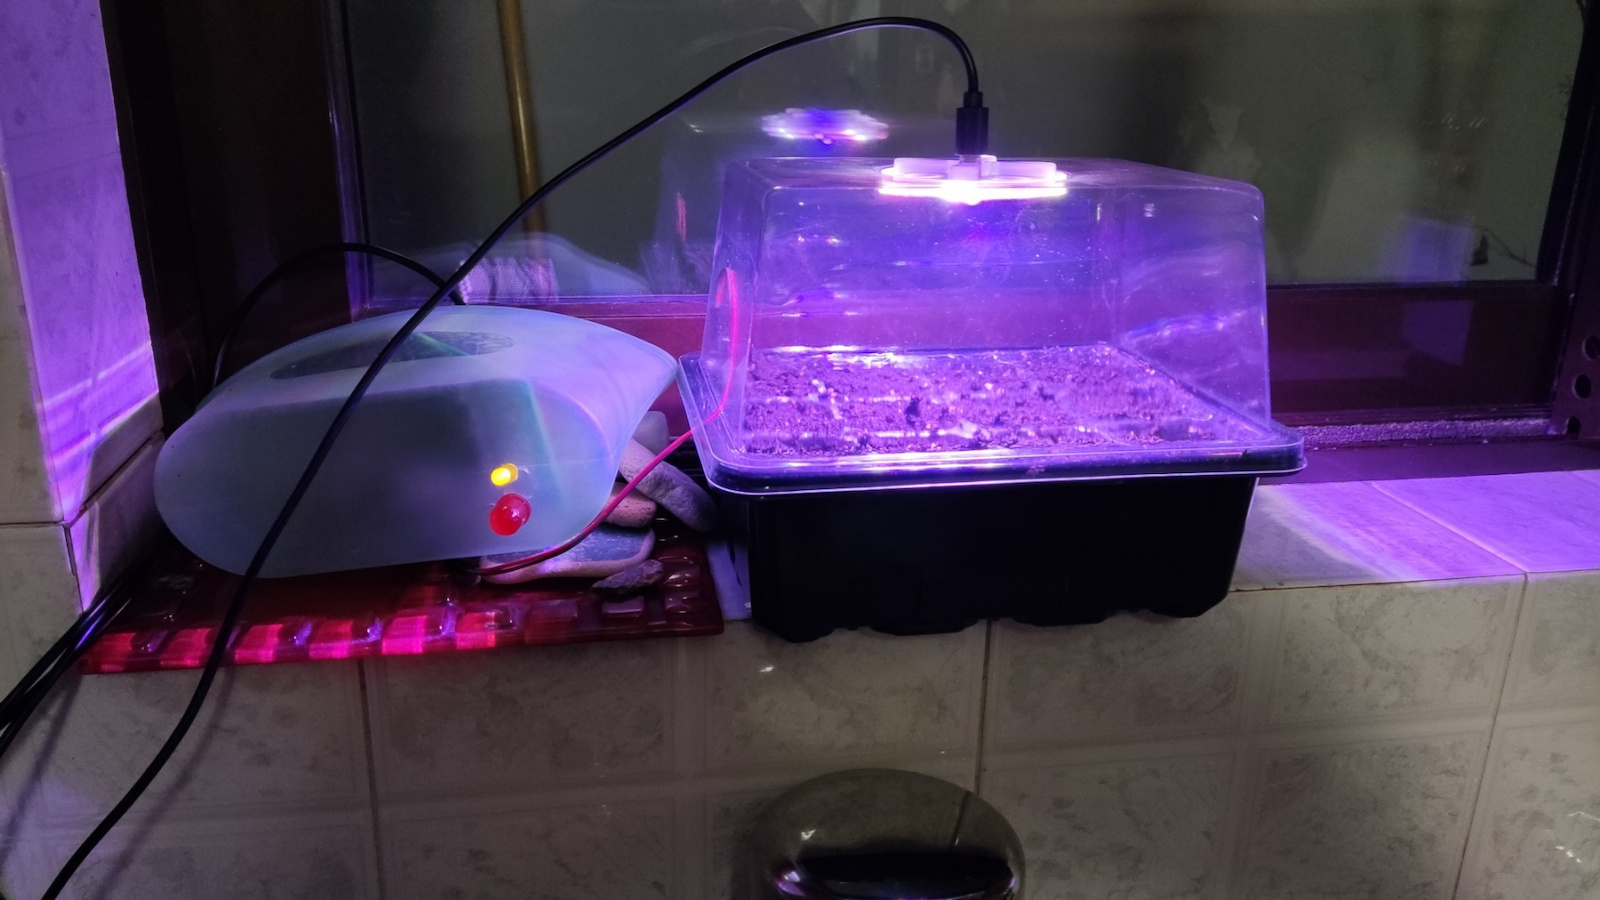
After testing it in my own smart greenhouse, I can say that this board is the top choice for anyone who wants to get started. Together with the soil moisture sensor, I programmed it to show me with LEDs (different colors) how much water is inside so I don’t forget to water...
Watered = no LED...
Almost dry = yellow
Dry = red!
Its big advantage is that it combines the power of a microcontroller with built-in Wi-Fi, which means you don’t need extra components to connect to the internet.
It is extremely stable and programming it via the Arduino IDE is super easy. It has plenty of pins (inputs/outputs) so you can connect sensors, displays, and LEDs at the same time, just like I did. The build quality of the CH340G chip is very good and I had no connection problems with my PC. If you want to make something of your own that "thinks" and can be controlled remotely, trust it without hesitation!
Why this board earns your trust:
- All in one: You don’t need separate boards for Wi-Fi and processor. It’s a complete package.
- Compatibility: Works perfectly with the Arduino IDE, which means there are thousands of ready-made guides and help online if you get stuck.
- Durability: Even though it’s small, it handles power supply and sensor signals very well without "freezing."
- Very economical!
Technical Tips for new users:
Drivers: If your computer doesn’t recognize the board, download the CH340 driver. Without it, the NodeMCU won’t show up in the "Port" of the Arduino IDE.
Baud Rate: In your code and Serial Monitor use 115200 baud. This is the standard speed for this board to correctly view sensor values.
Board Manager: In the Arduino IDE, add the URL for "esp8266 boards" in the preferences and select "NodeMCU 1.0 (ESP-12E Module)" for proper uploading.
Deep Sleep: Don’t forget that the board supports Wi-Fi! If you want to run it on battery, take advantage of the standby mode so it lasts for months.
⭐⭐⭐⭐⭐
NodeMCU ESP8266 – Η "καρδιά" κάθε έξυπνης κατασκευής!
Μπορεις να κανεις ΠΑΡΑ πολλα μαζι του (οπως τα ARDUINO)
Μετά από δοκιμές στο δικό μου smart greenhouse, μπορώ να πω ότι το συγκεκριμένο board είναι η κορυφαία επιλογή για όποιον θέλει να ξεκινήσει. Μαζι με τον σενσορα υγρασιας εδαφους Το προγραμματισα να μου δείχνει με led (διαφορα χρωματα) ποσο νερο εχει μεσα για να μην ξεχναω να ποτιζω...
Ποτισμενο = κανενα Led ...
Κοντευει να στεγνωσει= κιτρινο
Ειναι στεγνο= κοκκινο!
Το μεγάλο του πλεονέκτημα είναι ότι συνδυάζει τη δύναμη ενός μικροελεγκτή με ενσωματωμένο Wi-Fi, πράγμα που σημαίνει ότι δεν χρειάζεσαι έξτρα εξαρτήματα για να συνδεθείς στο ίντερνετ.
Είναι εξαιρετικά σταθερό και ο προγραμματισμός του μέσω Arduino IDE γίνεται πανεύκολα. Έχει αρκετά Pins (εισόδους/εξόδους) για να συνδέσεις ταυτόχρονα αισθητήρες, οθόνες και LED, όπως έκανα κι εγώ. Η ποιότητα κατασκευής του CH340G chip είναι πολύ καλή και δεν μου δημιούργησε κανένα πρόβλημα σύνδεσης με το PC. Αν θέλετε να φτιάξετε κάτι δικό σας που να "σκέφτεται" και να ελέγχεται εξ αποστάσεως, εμπιστευτείτε το άφοβα!»
Γιατί αυτό το board κερδίζει την εμπιστοσύνη:
- Όλα σε ένα: Δεν χρειάζεσαι ξεχωριστές πλακέτες για Wi-Fi και επεξεργαστή. Είναι ένα ολοκληρωμένο πακέτο.
- Συμβατότητα: Λειτουργεί άψογα με το Arduino IDE, που σημαίνει ότι υπάρχουν χιλιάδες έτοιμοι οδηγοί και βοήθεια στο ίντερνετ αν κολλήσεις κάπου.
- Αντοχή: Παρόλο που είναι μικρό, διαχειρίζεται πολύ καλά την τροφοδοσία και τα σήματα από τους αισθητήρες χωρίς να "κολλάει".
- Πολυ οικονομικο!
Τεχνικά Tips για νέους χρήστες:
Drivers: Αν ο υπολογιστής δεν αναγνωρίζει την πλακέτα, κατεβάστε τον driver CH340. Χωρίς αυτόν, το NodeMCU δεν θα εμφανιστεί στο "Port" του Arduino IDE.
Baud Rate: Στον κώδικα και στο Serial Monitor χρησιμοποιήστε τα 115200 baud. Είναι η στάνταρ ταχύτητα για αυτό το board για να βλέπετε σωστά τις τιμές του αισθητήρα.
Board Manager: Στο Arduino IDE, προσθέστε το URL για τα "esp8266 boards" στις προτιμήσεις και επιλέξτε το "NodeMCU 1.0 (ESP-12E Module)" για να γίνει το σωστό upload.
Deep Sleep: Μην ξεχνάτε ότι το board υποστηρίζει Wi-Fi! Αν θέλετε να το δουλέψετε με μπαταρία, εκμεταλλευτείτε τη λειτουργία αναμονής για να κρατήσει μήνες.
I connected it with sct-013 and with an "easy" online tutorial (calibration is a bit painful) I have a power consumption meter connected to the home assistant
Το συνδεσα με sct-013 και με "ευκολο" online tutorial (το καλιμπραρισμα ειναι λιγο επιπονο) εχω μετρητη καταναλωσης ρευματος συνδεδεμενο με το home assistant
Very good, cheap, and greatly reduces the cost of robotics, STEM, etc. projects compared to Arduino. Instead of buying screens, bulbs, switches, trimmers, etc., you can turn the NodeMCU into a router-server, connect it to your mobile phone via its WiFi, and control cars, robotic arms, temperature-humidity, etc.
I installed MicroPython to easily transfer projects to more powerful boards like the ESP32, Raspberry Pi Zero, etc.
Additionally, it can be powered by voltages ranging from 7 to 12V (theoretically up to 20V), eliminating the need for power banks, voltage regulators (7805), or step-up-down converters. Not all boards have built-in voltage regulators.
Πολύ καλό, φτηνό και μειώνει πολύ το κόστος των project της ρομποτικής, stem κτλ σε σχέση με τα arduino.
Αντί να αγοράζεις οθονίτσες, λαμπάκια, διακοπτάκια, τριμεράκια κτλ, κάνεις το nodemcu ρούτερ-σέρβερ, συνδέεσαι με το κινητό μέσω του wifi του και ελέγχεις αυτοκινητάκια, ρομποτικά χέρια, θερμοκρασία-υγρασία κτλ.
Εγώ έβαλα micropython για να είναι εύκολη η μεταφορά των project σε ισχυρότερα board, όπως το esp32, το raspberry pi Zero κτλ.
Επιπλέον μπορεί να τροφοδοτηθεί με τάσεις 7 ως 12V(20V θεωρητικά) και να μην χρειαστεί να χρησιμοποιούμε powerbank, ρυθμιστές τάσεις(7805) ή step-up-down. Δεν έχουν όλες οι πλακέτες ενσωματωμένους ρυθμιστές τάσης.
Average. I would recommend if you want a "wifi jammer" or wifi repeater, to buy the esp8266 cp2102 NodeMcu (amica). Because it is smaller and faster.
Μετριο. Θα πρότεινα αν το θέλετε για "wifi jammer" η wifi repeater, να αγοράσετε το esp8266 cp2102 NodeMcu (amica). Γτ ειναι μικρότερο και πιο γρήγορο.
It does what it was designed to do. Perfectly compatible for Arduino projects. Excellent transmission. Satisfactory bitrate. Simply handles temperature that was corrected through software! If referred to as a jammer, its value and the code of every developer are underestimated.
Κάνει αυτό που κατασκευάστηκε για να κάνει. Απόλυτα συμβατό για Arduino projects . Άψογη μετάδοση.Ικανοποιητικο bitrate. Απλά σηκώνε θερμοκρασία που διορθωθηκε μέσω λογισμικού! Εάν και αναφέρεται ως jammer , με αυτό τον χαρακτηρισμό υποτιμάται η αξία του και ο κώδικας του κάθε developer.
⭐⭐⭐⭐⭐
NodeMCU ESP8266 – The "heart" of every smart project!
You can do SO many things with it (just like ARDUINO)
After testing it in my own smart greenhouse, I can say that this board is the top choice for anyone who wants to get started. Together with the soil moisture sensor, I programmed it to show me with LEDs (different colors) how much water is inside so I don’t forget to water...
Watered = no LED...
Almost dry = yellow
Dry = red!
Its big advantage is that it combines the power of a microcontroller with built-in Wi-Fi, which means you don’t need extra components to connect to the internet.
It is extremely stable and programming it via the Arduino IDE is super easy. It has plenty of pins (inputs/outputs) so you can connect sensors, displays, and LEDs at the same time, just like I did. The build quality of the CH340G chip is very good and I had no connection problems with my PC. If you want to make something of your own that "thinks" and can be controlled remotely, trust it without hesitation!
Why this board earns your trust:
- All in one: You don’t need separate boards for Wi-Fi and processor. It’s a complete package.
- Compatibility: Works perfectly with the Arduino IDE, which means there are thousands of ready-made guides and help online if you get stuck.
- Durability: Even though it’s small, it handles power supply and sensor signals very well without "freezing."
- Very economical!
Technical Tips for new users:
Drivers: If your computer doesn’t recognize the board, download the CH340 driver. Without it, the NodeMCU won’t show up in the "Port" of the Arduino IDE.
Baud Rate: In your code and Serial Monitor use 115200 baud. This is the standard speed for this board to correctly view sensor values.
Board Manager: In the Arduino IDE, add the URL for "esp8266 boards" in the preferences and select "NodeMCU 1.0 (ESP-12E Module)" for proper uploading.
Deep Sleep: Don’t forget that the board supports Wi-Fi! If you want to run it on battery, take advantage of the standby mode so it lasts for months.
⭐⭐⭐⭐⭐
NodeMCU ESP8266 – Η "καρδιά" κάθε έξυπνης κατασκευής!
Μπορεις να κανεις ΠΑΡΑ πολλα μαζι του (οπως τα ARDUINO)
Μετά από δοκιμές στο δικό μου smart greenhouse, μπορώ να πω ότι το συγκεκριμένο board είναι η κορυφαία επιλογή για όποιον θέλει να ξεκινήσει. Μαζι με τον σενσορα υγρασιας εδαφους Το προγραμματισα να μου δείχνει με led (διαφορα χρωματα) ποσο νερο εχει μεσα για να μην ξεχναω να ποτιζω...
Ποτισμενο = κανενα Led ...
Κοντευει να στεγνωσει= κιτρινο
Ειναι στεγνο= κοκκινο!
Το μεγάλο του πλεονέκτημα είναι ότι συνδυάζει τη δύναμη ενός μικροελεγκτή με ενσωματωμένο Wi-Fi, πράγμα που σημαίνει ότι δεν χρειάζεσαι έξτρα εξαρτήματα για να συνδεθείς στο ίντερνετ.
Είναι εξαιρετικά σταθερό και ο προγραμματισμός του μέσω Arduino IDE γίνεται πανεύκολα. Έχει αρκετά Pins (εισόδους/εξόδους) για να συνδέσεις ταυτόχρονα αισθητήρες, οθόνες και LED, όπως έκανα κι εγώ. Η ποιότητα κατασκευής του CH340G chip είναι πολύ καλή και δεν μου δημιούργησε κανένα πρόβλημα σύνδεσης με το PC. Αν θέλετε να φτιάξετε κάτι δικό σας που να "σκέφτεται" και να ελέγχεται εξ αποστάσεως, εμπιστευτείτε το άφοβα!»
Γιατί αυτό το board κερδίζει την εμπιστοσύνη:
- Όλα σε ένα: Δεν χρειάζεσαι ξεχωριστές πλακέτες για Wi-Fi και επεξεργαστή. Είναι ένα ολοκληρωμένο πακέτο.
- Συμβατότητα: Λειτουργεί άψογα με το Arduino IDE, που σημαίνει ότι υπάρχουν χιλιάδες έτοιμοι οδηγοί και βοήθεια στο ίντερνετ αν κολλήσεις κάπου.
- Αντοχή: Παρόλο που είναι μικρό, διαχειρίζεται πολύ καλά την τροφοδοσία και τα σήματα από τους αισθητήρες χωρίς να "κολλάει".
- Πολυ οικονομικο!
Τεχνικά Tips για νέους χρήστες:
Drivers: Αν ο υπολογιστής δεν αναγνωρίζει την πλακέτα, κατεβάστε τον driver CH340. Χωρίς αυτόν, το NodeMCU δεν θα εμφανιστεί στο "Port" του Arduino IDE.
Baud Rate: Στον κώδικα και στο Serial Monitor χρησιμοποιήστε τα 115200 baud. Είναι η στάνταρ ταχύτητα για αυτό το board για να βλέπετε σωστά τις τιμές του αισθητήρα.
Board Manager: Στο Arduino IDE, προσθέστε το URL για τα "esp8266 boards" στις προτιμήσεις και επιλέξτε το "NodeMCU 1.0 (ESP-12E Module)" για να γίνει το σωστό upload.
Deep Sleep: Μην ξεχνάτε ότι το board υποστηρίζει Wi-Fi! Αν θέλετε να το δουλέψετε με μπαταρία, εκμεταλλευτείτε τη λειτουργία αναμονής για να κρατήσει μήνες.
I connected it with sct-013 and with an "easy" online tutorial (calibration is a bit painful) I have a power consumption meter connected to the home assistant
Το συνδεσα με sct-013 και με "ευκολο" online tutorial (το καλιμπραρισμα ειναι λιγο επιπονο) εχω μετρητη καταναλωσης ρευματος συνδεδεμενο με το home assistant
Very good, cheap, and greatly reduces the cost of robotics, STEM, etc. projects compared to Arduino. Instead of buying screens, bulbs, switches, trimmers, etc., you can turn the NodeMCU into a router-server, connect it to your mobile phone via its WiFi, and control cars, robotic arms, temperature-humidity, etc.
I installed MicroPython to easily transfer projects to more powerful boards like the ESP32, Raspberry Pi Zero, etc.
Additionally, it can be powered by voltages ranging from 7 to 12V (theoretically up to 20V), eliminating the need for power banks, voltage regulators (7805), or step-up-down converters. Not all boards have built-in voltage regulators.
Πολύ καλό, φτηνό και μειώνει πολύ το κόστος των project της ρομποτικής, stem κτλ σε σχέση με τα arduino.
Αντί να αγοράζεις οθονίτσες, λαμπάκια, διακοπτάκια, τριμεράκια κτλ, κάνεις το nodemcu ρούτερ-σέρβερ, συνδέεσαι με το κινητό μέσω του wifi του και ελέγχεις αυτοκινητάκια, ρομποτικά χέρια, θερμοκρασία-υγρασία κτλ.
Εγώ έβαλα micropython για να είναι εύκολη η μεταφορά των project σε ισχυρότερα board, όπως το esp32, το raspberry pi Zero κτλ.
Επιπλέον μπορεί να τροφοδοτηθεί με τάσεις 7 ως 12V(20V θεωρητικά) και να μην χρειαστεί να χρησιμοποιούμε powerbank, ρυθμιστές τάσεις(7805) ή step-up-down. Δεν έχουν όλες οι πλακέτες ενσωματωμένους ρυθμιστές τάσης.
Discover the NodeMCU V3 with CH340G. Open-source platform with Lua & Arduino style programming, ideal for rapid development of IoT applications at the lowest market cost.
IoT Development at the Lowest Cost
The NodeMCU V3 is the ultimate solution for developing Internet of Things (IoT) applications. It is an open-source, interactive, and programmable platform that combines Wi-Fi connectivity and low cost, offering creators the best tool for smart devices.
Advanced Hardware IO & API
Equipped with Arduino-type hardware IO, the NodeMCU features an advanced API that drastically reduces unnecessary work for configuring and handling the hardware. It allows direct control of sensors and peripherals with minimal lines of code.
Programming in Arduino & Lua Style
Write code with the ease of Arduino, but with the interactivity of Lua scripts. This combination allows developers to experiment in real time, significantly speeding up the process of prototyping and testing their applications.
Network API in Node.js Style
NodeMCU introduces an event-driven API for network applications, strongly reminiscent of the Nodejs style. This makes it easier for developers to write code that runs on a microcontroller (MCU) just 5mm*5mm in size, while maintaining the logic of modern web applications.
Reliable CH340G Interface
This version uses the CH340G chip for USB-to-Serial conversion, replacing the CP2102. It is a tested and reliable solution that ensures stable communication with your computer for programming and debugging the device.
Acceleration of IoT Applications
Designed to be simple yet smart, the NodeMCU accelerates the creation of IoT solutions from scratch. Whether for home automation or industrial sensors, it provides a WI-FI enabled platform that is ready to connect to the world.
Specifications are collected from official manufacturer websites. Please verify the specifications before proceeding with your final purchase. If you notice any problem you can report it here.
Users rate the board very positively, particularly for its built-in Wi‑Fi and how easy it is to use with Arduino and other projects. They use it for automation, measurements, and LED control, and note that it can help reduce project costs. However, some mention difficulties with the drivers and setup, and one user reported receiving a board without a Wi‑Fi chip.
⭐⭐⭐⭐⭐
NodeMCU ESP8266 – The "heart" of every smart project!
You can do SO many things with it (just like ARDUINO)
After testing it in my own smart greenhouse, I can say that this board is the top choice for anyone who wants to get started. Together with the soil moisture sensor, I programmed it to show me with LEDs (different colors) how much water is inside so I don’t forget to water...
Watered = no LED...
Almost dry = yellow
Dry = red!
Its big advantage is that it combines the power of a microcontroller with built-in Wi-Fi, which means you don’t need extra components to connect to the internet.
It is extremely stable and programming it via the Arduino IDE is super easy. It has plenty of pins (inputs/outputs) so you can connect sensors, displays, and LEDs at the same time, just like I did. The build quality of the CH340G chip is very good and I had no connection problems with my PC. If you want to make something of your own that "thinks" and can be controlled remotely, trust it without hesitation!
Why this board earns your trust:
- All in one: You don’t need separate boards for Wi-Fi and processor. It’s a complete package.
- Compatibility: Works perfectly with the Arduino IDE, which means there are thousands of ready-made guides and help online if you get stuck.
- Durability: Even though it’s small, it handles power supply and sensor signals very well without "freezing."
- Very economical!
Technical Tips for new users:
Drivers: If your computer doesn’t recognize the board, download the CH340 driver. Without it, the NodeMCU won’t show up in the "Port" of the Arduino IDE.
Baud Rate: In your code and Serial Monitor use 115200 baud. This is the standard speed for this board to correctly view sensor values.
Board Manager: In the Arduino IDE, add the URL for "esp8266 boards" in the preferences and select "NodeMCU 1.0 (ESP-12E Module)" for proper uploading.
Deep Sleep: Don’t forget that the board supports Wi-Fi! If you want to run it on battery, take advantage of the standby mode so it lasts for months.
⭐⭐⭐⭐⭐
NodeMCU ESP8266 – Η "καρδιά" κάθε έξυπνης κατασκευής!
Μπορεις να κανεις ΠΑΡΑ πολλα μαζι του (οπως τα ARDUINO)
Μετά από δοκιμές στο δικό μου smart greenhouse, μπορώ να πω ότι το συγκεκριμένο board είναι η κορυφαία επιλογή για όποιον θέλει να ξεκινήσει. Μαζι με τον σενσορα υγρασιας εδαφους Το προγραμματισα να μου δείχνει με led (διαφορα χρωματα) ποσο νερο εχει μεσα για να μην ξεχναω να ποτιζω...
Ποτισμενο = κανενα Led ...
Κοντευει να στεγνωσει= κιτρινο
Ειναι στεγνο= κοκκινο!
Το μεγάλο του πλεονέκτημα είναι ότι συνδυάζει τη δύναμη ενός μικροελεγκτή με ενσωματωμένο Wi-Fi, πράγμα που σημαίνει ότι δεν χρειάζεσαι έξτρα εξαρτήματα για να συνδεθείς στο ίντερνετ.
Είναι εξαιρετικά σταθερό και ο προγραμματισμός του μέσω Arduino IDE γίνεται πανεύκολα. Έχει αρκετά Pins (εισόδους/εξόδους) για να συνδέσεις ταυτόχρονα αισθητήρες, οθόνες και LED, όπως έκανα κι εγώ. Η ποιότητα κατασκευής του CH340G chip είναι πολύ καλή και δεν μου δημιούργησε κανένα πρόβλημα σύνδεσης με το PC. Αν θέλετε να φτιάξετε κάτι δικό σας που να "σκέφτεται" και να ελέγχεται εξ αποστάσεως, εμπιστευτείτε το άφοβα!»
Γιατί αυτό το board κερδίζει την εμπιστοσύνη:
- Όλα σε ένα: Δεν χρειάζεσαι ξεχωριστές πλακέτες για Wi-Fi και επεξεργαστή. Είναι ένα ολοκληρωμένο πακέτο.
- Συμβατότητα: Λειτουργεί άψογα με το Arduino IDE, που σημαίνει ότι υπάρχουν χιλιάδες έτοιμοι οδηγοί και βοήθεια στο ίντερνετ αν κολλήσεις κάπου.
- Αντοχή: Παρόλο που είναι μικρό, διαχειρίζεται πολύ καλά την τροφοδοσία και τα σήματα από τους αισθητήρες χωρίς να "κολλάει".
- Πολυ οικονομικο!
Τεχνικά Tips για νέους χρήστες:
Drivers: Αν ο υπολογιστής δεν αναγνωρίζει την πλακέτα, κατεβάστε τον driver CH340. Χωρίς αυτόν, το NodeMCU δεν θα εμφανιστεί στο "Port" του Arduino IDE.
Baud Rate: Στον κώδικα και στο Serial Monitor χρησιμοποιήστε τα 115200 baud. Είναι η στάνταρ ταχύτητα για αυτό το board για να βλέπετε σωστά τις τιμές του αισθητήρα.
Board Manager: Στο Arduino IDE, προσθέστε το URL για τα "esp8266 boards" στις προτιμήσεις και επιλέξτε το "NodeMCU 1.0 (ESP-12E Module)" για να γίνει το σωστό upload.
Deep Sleep: Μην ξεχνάτε ότι το board υποστηρίζει Wi-Fi! Αν θέλετε να το δουλέψετε με μπαταρία, εκμεταλλευτείτε τη λειτουργία αναμονής για να κρατήσει μήνες.
I connected it with sct-013 and with an "easy" online tutorial (calibration is a bit painful) I have a power consumption meter connected to the home assistant
Το συνδεσα με sct-013 και με "ευκολο" online tutorial (το καλιμπραρισμα ειναι λιγο επιπονο) εχω μετρητη καταναλωσης ρευματος συνδεδεμενο με το home assistant
Very good, cheap, and greatly reduces the cost of robotics, STEM, etc. projects compared to Arduino. Instead of buying screens, bulbs, switches, trimmers, etc., you can turn the NodeMCU into a router-server, connect it to your mobile phone via its WiFi, and control cars, robotic arms, temperature-humidity, etc.
I installed MicroPython to easily transfer projects to more powerful boards like the ESP32, Raspberry Pi Zero, etc.
Additionally, it can be powered by voltages ranging from 7 to 12V (theoretically up to 20V), eliminating the need for power banks, voltage regulators (7805), or step-up-down converters. Not all boards have built-in voltage regulators.
Πολύ καλό, φτηνό και μειώνει πολύ το κόστος των project της ρομποτικής, stem κτλ σε σχέση με τα arduino.
Αντί να αγοράζεις οθονίτσες, λαμπάκια, διακοπτάκια, τριμεράκια κτλ, κάνεις το nodemcu ρούτερ-σέρβερ, συνδέεσαι με το κινητό μέσω του wifi του και ελέγχεις αυτοκινητάκια, ρομποτικά χέρια, θερμοκρασία-υγρασία κτλ.
Εγώ έβαλα micropython για να είναι εύκολη η μεταφορά των project σε ισχυρότερα board, όπως το esp32, το raspberry pi Zero κτλ.
Επιπλέον μπορεί να τροφοδοτηθεί με τάσεις 7 ως 12V(20V θεωρητικά) και να μην χρειαστεί να χρησιμοποιούμε powerbank, ρυθμιστές τάσεις(7805) ή step-up-down. Δεν έχουν όλες οι πλακέτες ενσωματωμένους ρυθμιστές τάσης.
Average. I would recommend if you want a "wifi jammer" or wifi repeater, to buy the esp8266 cp2102 NodeMcu (amica). Because it is smaller and faster.
Μετριο. Θα πρότεινα αν το θέλετε για "wifi jammer" η wifi repeater, να αγοράσετε το esp8266 cp2102 NodeMcu (amica). Γτ ειναι μικρότερο και πιο γρήγορο.
It does what it was designed to do. Perfectly compatible for Arduino projects. Excellent transmission. Satisfactory bitrate. Simply handles temperature that was corrected through software! If referred to as a jammer, its value and the code of every developer are underestimated.
Κάνει αυτό που κατασκευάστηκε για να κάνει. Απόλυτα συμβατό για Arduino projects . Άψογη μετάδοση.Ικανοποιητικο bitrate. Απλά σηκώνε θερμοκρασία που διορθωθηκε μέσω λογισμικού! Εάν και αναφέρεται ως jammer , με αυτό τον χαρακτηρισμό υποτιμάται η αξία του και ο κώδικας του κάθε developer.
⭐⭐⭐⭐⭐
NodeMCU ESP8266 – The "heart" of every smart project!
You can do SO many things with it (just like ARDUINO)
After testing it in my own smart greenhouse, I can say that this board is the top choice for anyone who wants to get started. Together with the soil moisture sensor, I programmed it to show me with LEDs (different colors) how much water is inside so I don’t forget to water...
Watered = no LED...
Almost dry = yellow
Dry = red!
Its big advantage is that it combines the power of a microcontroller with built-in Wi-Fi, which means you don’t need extra components to connect to the internet.
It is extremely stable and programming it via the Arduino IDE is super easy. It has plenty of pins (inputs/outputs) so you can connect sensors, displays, and LEDs at the same time, just like I did. The build quality of the CH340G chip is very good and I had no connection problems with my PC. If you want to make something of your own that "thinks" and can be controlled remotely, trust it without hesitation!
Why this board earns your trust:
- All in one: You don’t need separate boards for Wi-Fi and processor. It’s a complete package.
- Compatibility: Works perfectly with the Arduino IDE, which means there are thousands of ready-made guides and help online if you get stuck.
- Durability: Even though it’s small, it handles power supply and sensor signals very well without "freezing."
- Very economical!
Technical Tips for new users:
Drivers: If your computer doesn’t recognize the board, download the CH340 driver. Without it, the NodeMCU won’t show up in the "Port" of the Arduino IDE.
Baud Rate: In your code and Serial Monitor use 115200 baud. This is the standard speed for this board to correctly view sensor values.
Board Manager: In the Arduino IDE, add the URL for "esp8266 boards" in the preferences and select "NodeMCU 1.0 (ESP-12E Module)" for proper uploading.
Deep Sleep: Don’t forget that the board supports Wi-Fi! If you want to run it on battery, take advantage of the standby mode so it lasts for months.
⭐⭐⭐⭐⭐
NodeMCU ESP8266 – Η "καρδιά" κάθε έξυπνης κατασκευής!
Μπορεις να κανεις ΠΑΡΑ πολλα μαζι του (οπως τα ARDUINO)
Μετά από δοκιμές στο δικό μου smart greenhouse, μπορώ να πω ότι το συγκεκριμένο board είναι η κορυφαία επιλογή για όποιον θέλει να ξεκινήσει. Μαζι με τον σενσορα υγρασιας εδαφους Το προγραμματισα να μου δείχνει με led (διαφορα χρωματα) ποσο νερο εχει μεσα για να μην ξεχναω να ποτιζω...
Ποτισμενο = κανενα Led ...
Κοντευει να στεγνωσει= κιτρινο
Ειναι στεγνο= κοκκινο!
Το μεγάλο του πλεονέκτημα είναι ότι συνδυάζει τη δύναμη ενός μικροελεγκτή με ενσωματωμένο Wi-Fi, πράγμα που σημαίνει ότι δεν χρειάζεσαι έξτρα εξαρτήματα για να συνδεθείς στο ίντερνετ.
Είναι εξαιρετικά σταθερό και ο προγραμματισμός του μέσω Arduino IDE γίνεται πανεύκολα. Έχει αρκετά Pins (εισόδους/εξόδους) για να συνδέσεις ταυτόχρονα αισθητήρες, οθόνες και LED, όπως έκανα κι εγώ. Η ποιότητα κατασκευής του CH340G chip είναι πολύ καλή και δεν μου δημιούργησε κανένα πρόβλημα σύνδεσης με το PC. Αν θέλετε να φτιάξετε κάτι δικό σας που να "σκέφτεται" και να ελέγχεται εξ αποστάσεως, εμπιστευτείτε το άφοβα!»
Γιατί αυτό το board κερδίζει την εμπιστοσύνη:
- Όλα σε ένα: Δεν χρειάζεσαι ξεχωριστές πλακέτες για Wi-Fi και επεξεργαστή. Είναι ένα ολοκληρωμένο πακέτο.
- Συμβατότητα: Λειτουργεί άψογα με το Arduino IDE, που σημαίνει ότι υπάρχουν χιλιάδες έτοιμοι οδηγοί και βοήθεια στο ίντερνετ αν κολλήσεις κάπου.
- Αντοχή: Παρόλο που είναι μικρό, διαχειρίζεται πολύ καλά την τροφοδοσία και τα σήματα από τους αισθητήρες χωρίς να "κολλάει".
- Πολυ οικονομικο!
Τεχνικά Tips για νέους χρήστες:
Drivers: Αν ο υπολογιστής δεν αναγνωρίζει την πλακέτα, κατεβάστε τον driver CH340. Χωρίς αυτόν, το NodeMCU δεν θα εμφανιστεί στο "Port" του Arduino IDE.
Baud Rate: Στον κώδικα και στο Serial Monitor χρησιμοποιήστε τα 115200 baud. Είναι η στάνταρ ταχύτητα για αυτό το board για να βλέπετε σωστά τις τιμές του αισθητήρα.
Board Manager: Στο Arduino IDE, προσθέστε το URL για τα "esp8266 boards" στις προτιμήσεις και επιλέξτε το "NodeMCU 1.0 (ESP-12E Module)" για να γίνει το σωστό upload.
Deep Sleep: Μην ξεχνάτε ότι το board υποστηρίζει Wi-Fi! Αν θέλετε να το δουλέψετε με μπαταρία, εκμεταλλευτείτε τη λειτουργία αναμονής για να κρατήσει μήνες.
I connected it with sct-013 and with an "easy" online tutorial (calibration is a bit painful) I have a power consumption meter connected to the home assistant
Το συνδεσα με sct-013 και με "ευκολο" online tutorial (το καλιμπραρισμα ειναι λιγο επιπονο) εχω μετρητη καταναλωσης ρευματος συνδεδεμενο με το home assistant
Very good, cheap, and greatly reduces the cost of robotics, STEM, etc. projects compared to Arduino. Instead of buying screens, bulbs, switches, trimmers, etc., you can turn the NodeMCU into a router-server, connect it to your mobile phone via its WiFi, and control cars, robotic arms, temperature-humidity, etc.
I installed MicroPython to easily transfer projects to more powerful boards like the ESP32, Raspberry Pi Zero, etc.
Additionally, it can be powered by voltages ranging from 7 to 12V (theoretically up to 20V), eliminating the need for power banks, voltage regulators (7805), or step-up-down converters. Not all boards have built-in voltage regulators.
Πολύ καλό, φτηνό και μειώνει πολύ το κόστος των project της ρομποτικής, stem κτλ σε σχέση με τα arduino.
Αντί να αγοράζεις οθονίτσες, λαμπάκια, διακοπτάκια, τριμεράκια κτλ, κάνεις το nodemcu ρούτερ-σέρβερ, συνδέεσαι με το κινητό μέσω του wifi του και ελέγχεις αυτοκινητάκια, ρομποτικά χέρια, θερμοκρασία-υγρασία κτλ.
Εγώ έβαλα micropython για να είναι εύκολη η μεταφορά των project σε ισχυρότερα board, όπως το esp32, το raspberry pi Zero κτλ.
Επιπλέον μπορεί να τροφοδοτηθεί με τάσεις 7 ως 12V(20V θεωρητικά) και να μην χρειαστεί να χρησιμοποιούμε powerbank, ρυθμιστές τάσεις(7805) ή step-up-down. Δεν έχουν όλες οι πλακέτες ενσωματωμένους ρυθμιστές τάσης.